Configuring PPTP VPN on a Cyberoam UTM w/ MS-CHAPv2
With the default configuration of PPTP VPN on the Cyberoam, only CHAP authentication is set.
The setup of PPTP on the Cyberoam UTM requires one hidden step.
Cyberoam UTM firmware - Version 10.01.270 or newer.
Step 1 – Enable PPTP
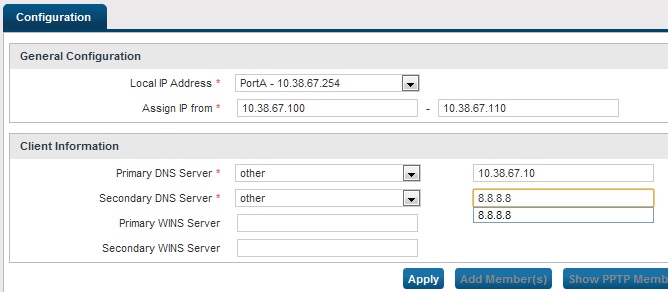
1. In the GUI interface, go to VPN -> PPTP
Under General Configuration: choose the local LAN address to be used by PPTP
2. Choose the range to assign to PPTP users
Note: Do not specify the same IP address range in L2TP configuration and PPTP configuration.
3. Specify the DNS Servers to be used.
4. Click "Apply"

Step 2 – Set Encryption and Authentication Methods
1. Login to the CLI Console: By clicking Console in the top right corner OR logging in via Telnet or SSH
Choose Menu Option # 4
2. Now use the following syntax to set the encryption and authentication:
console> set vpn pptp authentication MS-CHAPv2 encryption STRONG
3. you can review the settings with the following command:
console> show vpn configuration
Step 3 – Grant Users Logon access via PPTP
There are a few places to grant access to users:
A. Go to IDENTITY -> USERS and click the user you would like to grant PPTP access. Choose “Enable PPTP”.
B. Go to IDENTITY -> GROUPS and click the group you would like to grant PPTP access. Choose “Enable PPTP”.
C. Go to VPN -> PPTP and click “Add Member(s)” and Choose the ‘groups’ or ‘users’. And click Apply
Review Users/Groups with PPTP access:
Go to VPN—PPTP and click “Show PPTP Members” and Choose the ‘groups’ or ‘users’.
Diagnostics and Logging:
1. In CLI -
console> cyberoam diagnostics show syslog
2. In GUI - Go to LOGS & REPORTS -> LOG VIEWER
Choose View logs for “Authentication”


